
Flappy Bird is a very pleasant game and is not difficult to make it in the beginning. Today let’s build a bird game flying together at the beginning! I will show you how to control birds with space keys, build moving pillars, and renew the score every time the bird fly through it. This is Intermediate Scratch Project level.
If your child likes to make a game, explore the online award winner Scratching classLED live by an expert, and designed by professionals from Google, Stanford, and MIT. Join Free online class To learn with great instructors and get all the help needed to start the scratch coding.
See future Free Computer Sciences for Children Led by technology experts: Past events have performed guests from Pixar, NASA, Google, and more.
How to make flappy birds as the beginning
Like playing Flappy Bird? This is an interesting game where a bird flew through objects that passed without colliding with obstacles. Follow the steps below to create your own version at the beginning! See the Flappy Bird version that has been completed Here.
Scratch website: https://scratch.mit.edu/
1. Choose characters
The first thing to do is choose a sprite.
That could be a sprite! Be creative and choose a sprite with at least two costumes so that it looks like the sprite will move across the screen. You can avoid your cursor in each sprite to see if it is animpicated. We chose a parrot. We want to make sure the parrot is small enough to fly through the pillar. Adjust the “size” of the sprite in the lower right corner to 30 or something similar.
2. Add the code for the “Flappy” movement
Our next step is to encode the “flappy” movement for parrots with Scratching coding. Click the sprite icon in the lower right corner to make sure you add a block to the correct sprite. A box will appear around the sprite and in the middle of a lighter sprite image screen will be displayed at the top.
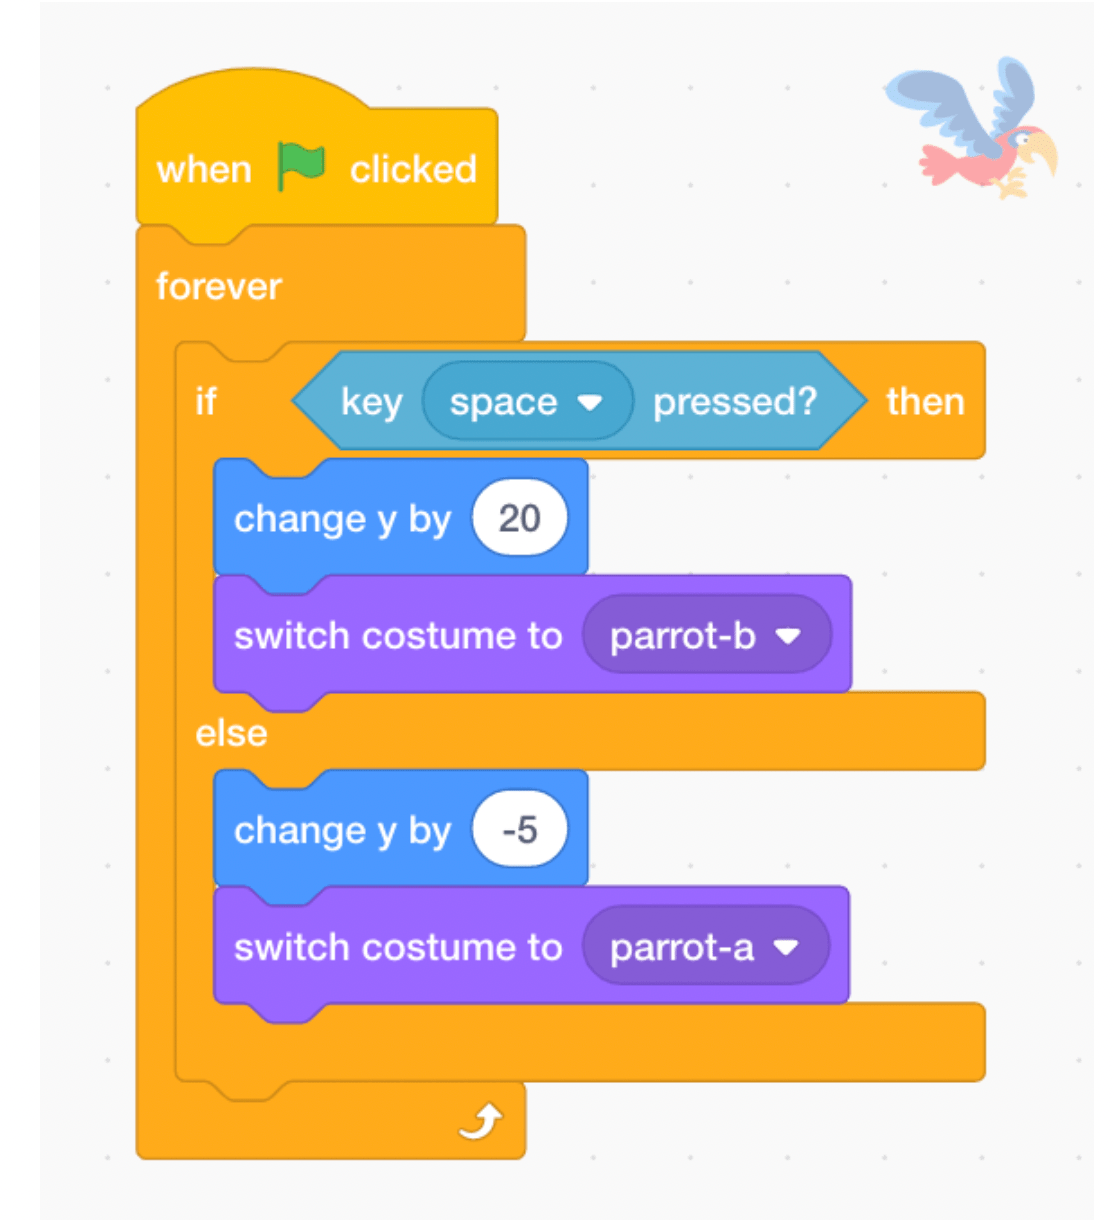
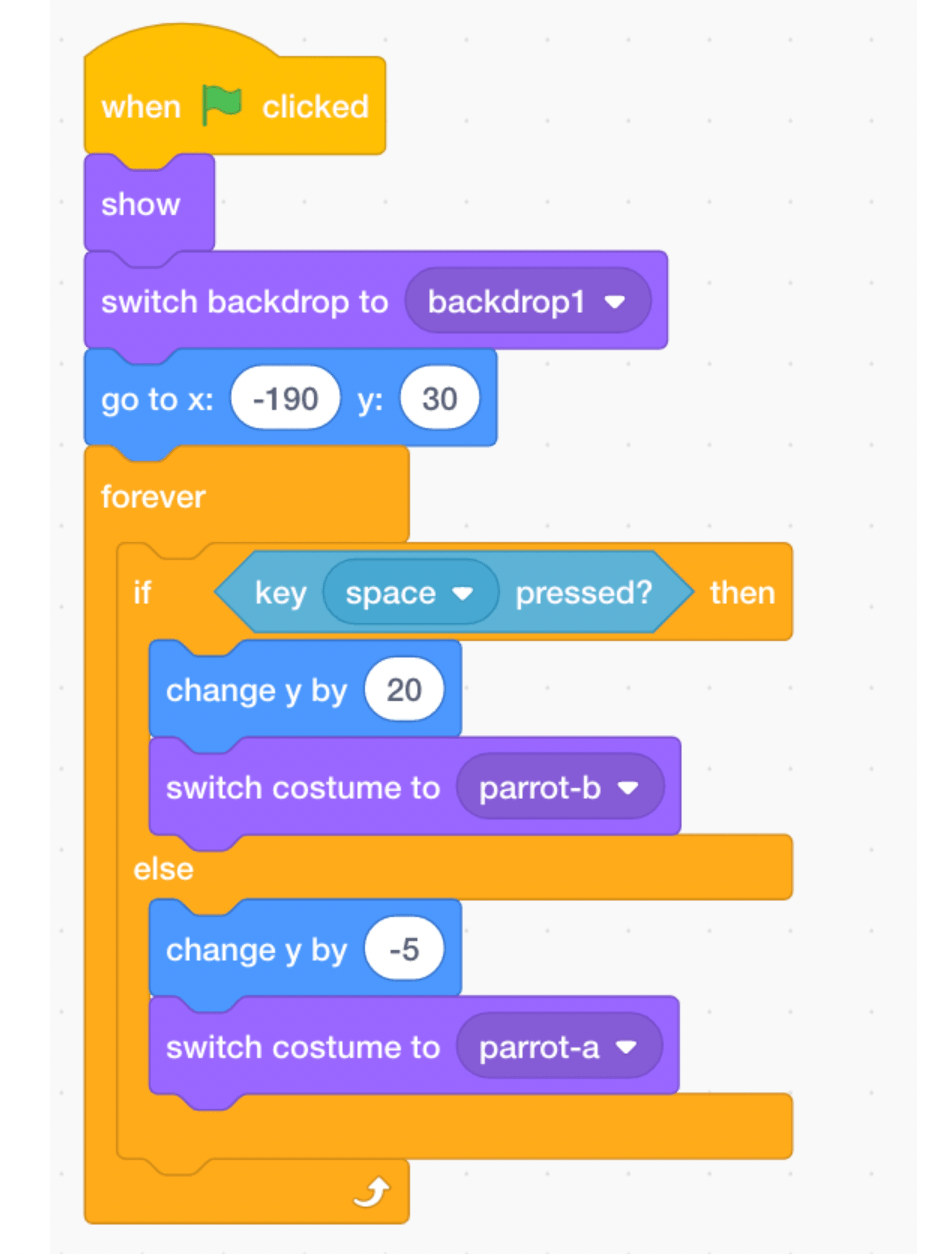
Start with the “When Green Flag” block from the event. Then get “forever” from control. Flappy movements must continue during the game. Inside “Forever”, place the “if/then/else” block from the control.
Flappy movements are controlled by the Space Blade: Every time the user hit the bird room rise. Conditions for the default IF statement are empty hexagons. Add the sensing block “when the room button is pressed” to the IF statement.
If the space is pressed, the sprite must rise … Use the “change Y by” Motion block by “and set the number 20. In our sample project, the bird looks like flying, so after we change Y, we want to use the” Switch Costume to Parrot-B “block.
Other conditions indicate what happens if the space is not pressed … then the sprite must start to fall a little. To do this, in other parts of the block, we need a block of “change Y with -5”. We still want to make it look like a flying parrot, so we want to use the “Switch Costume to Parrot-A” visible block for alternative costumes. In your project, alternately among your sprite costumes.
3. For the pillars that the bird will go through
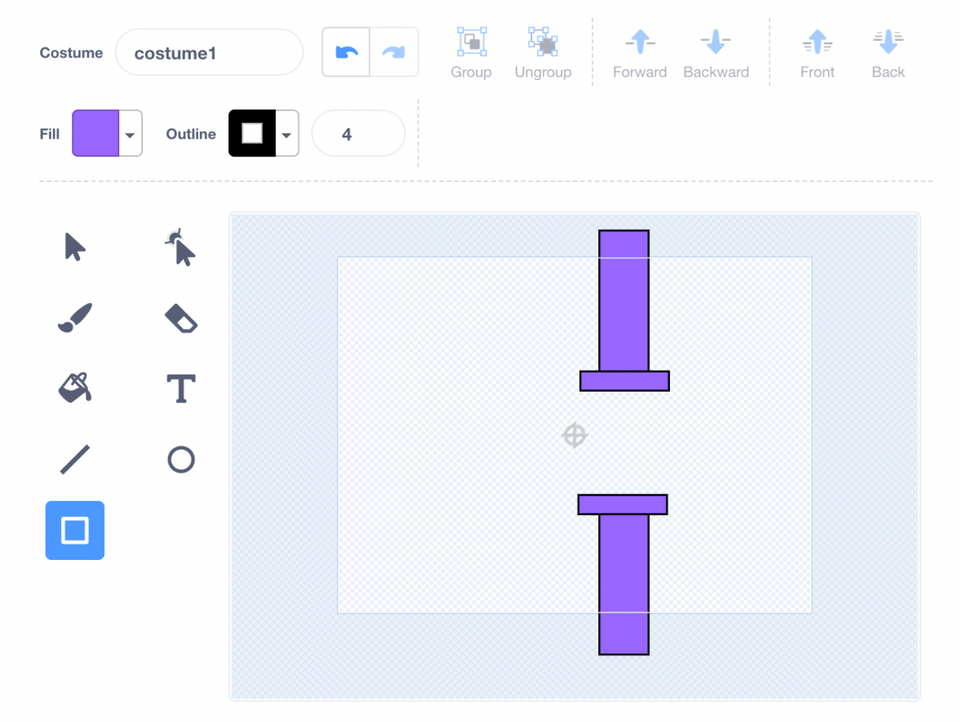
Our next step is to make a pillar so that the parrot is flying. We will do this by creating a special sprite. Navigate to the top of the circle in the lower right corner to add a sprite, and select the option (third from above) that looks like a brush.
Use the “Rectangle” icon from the last option in the first row to draw a pillar sprite. See below how two long vertical rectangles and two short horizontal rectangles are drawn and placed to make our pillars. Do not hesitate to change the color of filling and outline to be adjusted!
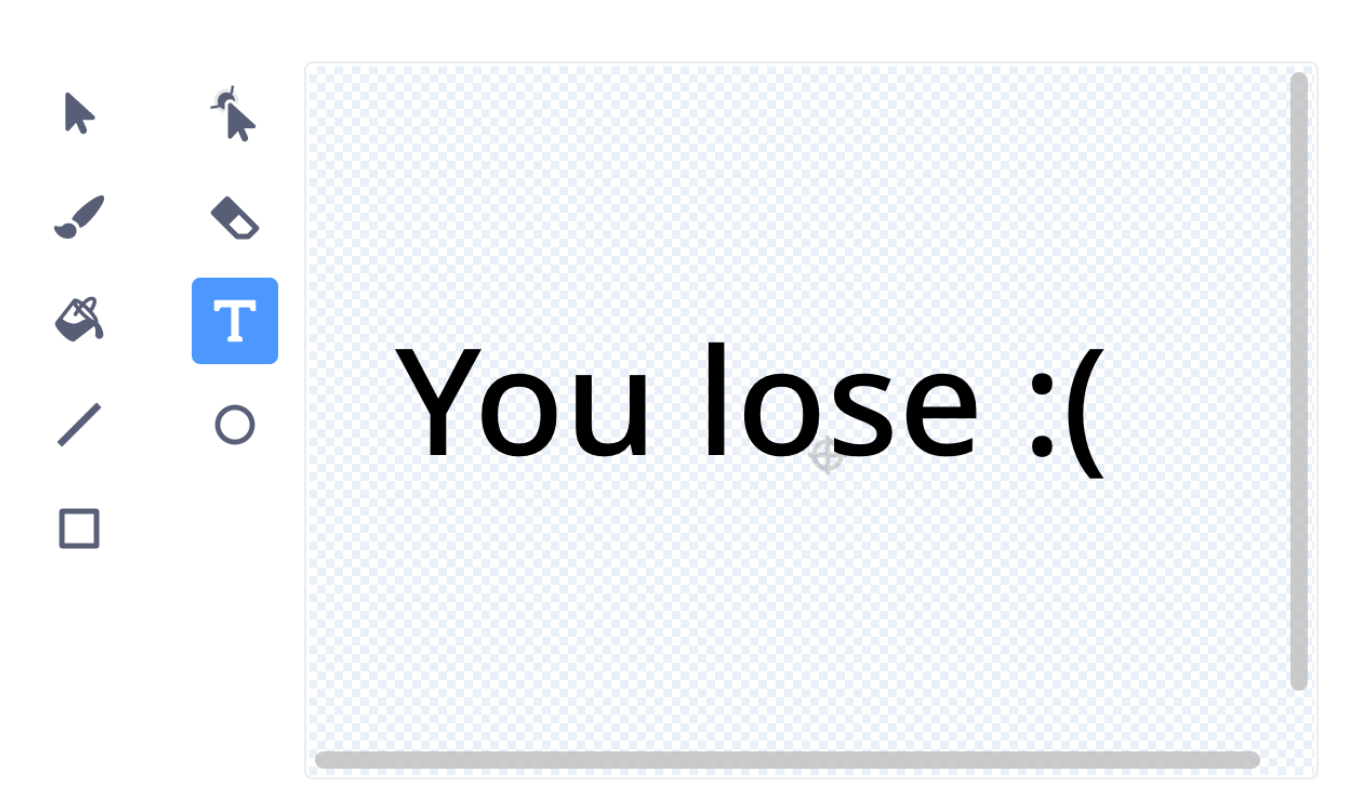
4. Make a background for the end of the game
Let’s also make a new custom background that shows the end of the game. Similar to the way we make a custom sprite, float over a circle in the lower right corner to add background, and choose an option (third from above) that looks like a brush. Use the “text” option in the second column to display messages to users who have ended the game.
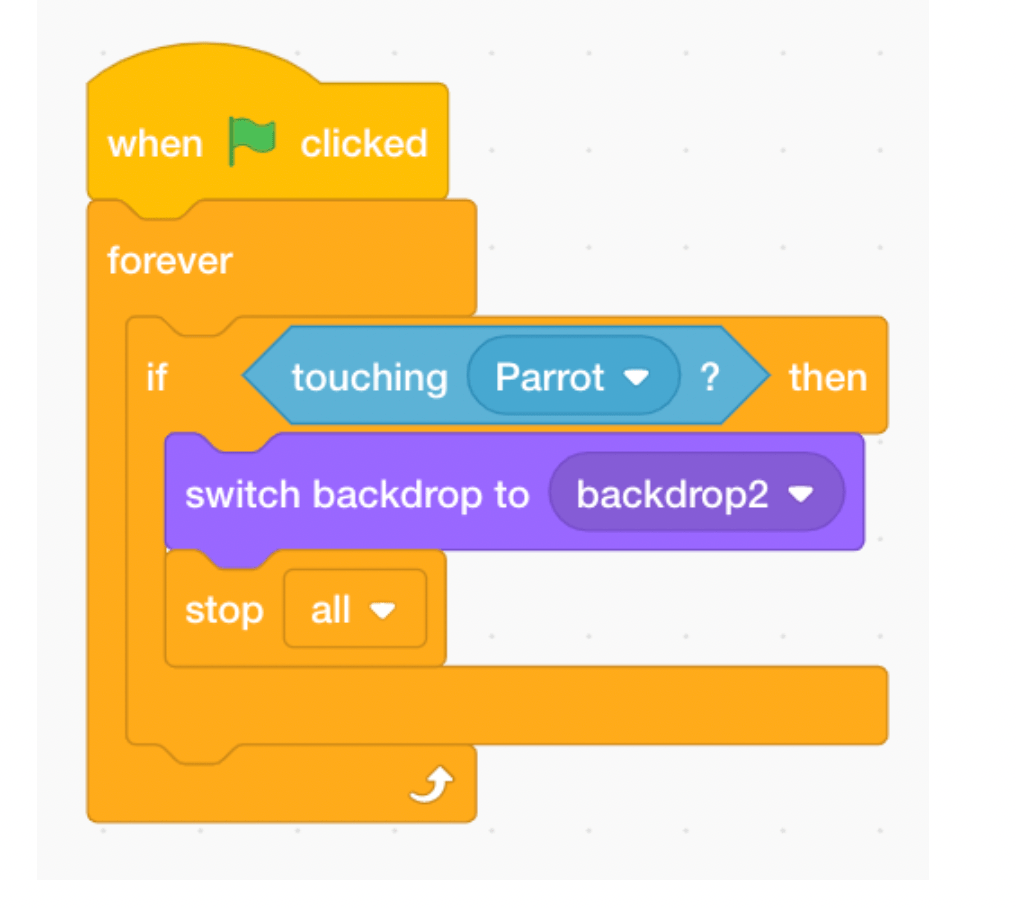
5. End the game if the bird touches the pillar
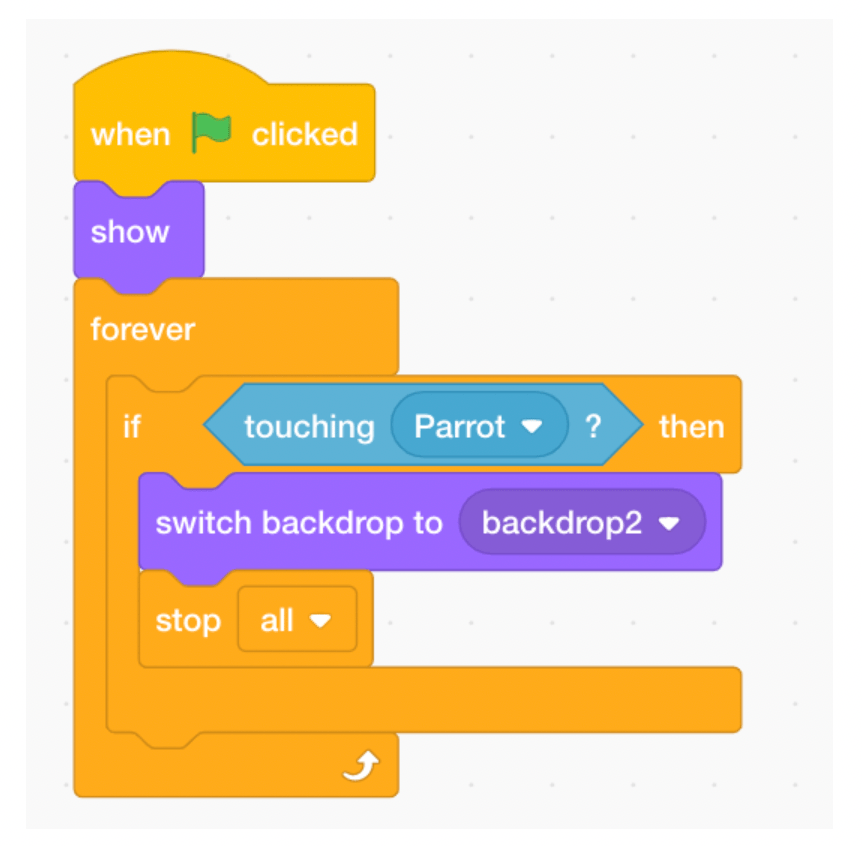
Click on the sprite pillar so we can add some code for it. The game must stop if the pillar touches your sprite. Start with the “When Green Flag” block Program. Underneath we added the “forever” block Control.
To check whether every time your sprite collides with a pillar, place the “if/then” block of the control inside “forever”. The condition for the if statement is Sensing Block “touching” your sprite name “. Make sure you change the choice of dropdown if necessary to reflect that your pillars and sprite are touching.
Currently it happens, we want to use Seen Block “Switch Backdrop to Backdrop2” to show that the game has ended and uses the “Stop All” control block.
6. Take care of the details to start and end the game
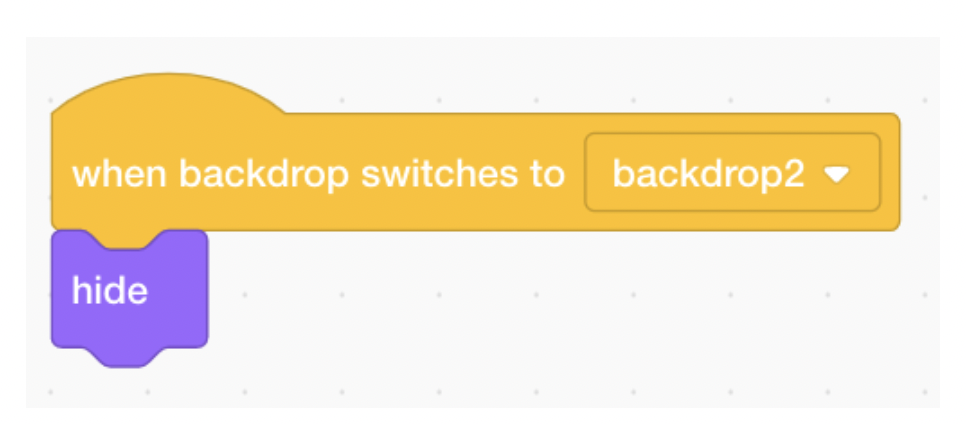
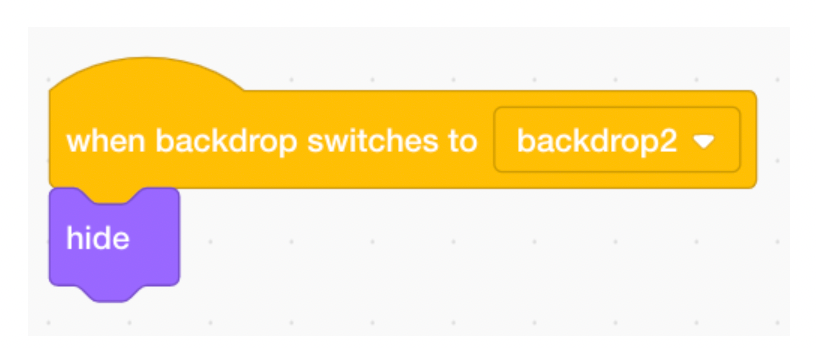
Click the main sprite and return to the code. Add the others Program Block: “When the background turns to the background2”. Attach the block looks “hide”. This ensures that Sprite disappears once the game ends.
Separate the “When Green Flag” and “Forever” blocks. Some blocks will be added between to ensure the game works well. Seen Block under “When Green Flag Click”, which ensures your sprite is seen at the beginning of each game. Then we want another Seen Block “Switch Backdrop to Backdrop1”. This will delete the background for the end of the game.
After that we want to “go to x/y” Movement block. This will set the initial location of the parrot. Specific coordinates are not important, but make sure the parrot starts on the left side of the screen and somewhere in the middle vertically. We set the X to 190 and Y to 30.
Re -connect “forever loop”. Also check to make sure your background names match the background that you switch. Your background might be named something different.
The remaining code is to add additional features to pillars. Click the sprite to continue the coding block there. Just like your sprite, we want the pillar to disappear when the game ends. We can do this with the same block: “When the background turns to the background2” and “hide”.
We also want to show pillars when the game starts, so place “performances” Seen Block between the “When Green Flag” and “Forever” blocks that we added before.
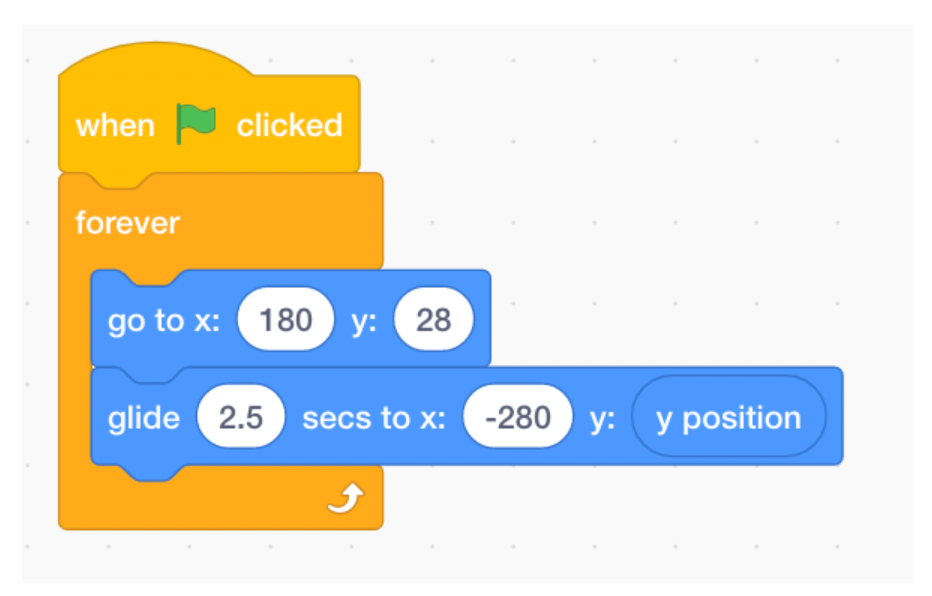
7. Make a Pillar Moving Crossing the Screen
Our next task is to make a pillar move across the screen. Because we started with a pillar on the right side, we will make them move left. Let’s get the “When Green Flag” block Program and the “forever” block from Control. We want pillars to move while the game is still ongoing.
In “Forever”, we want to “go to X/Y” Movement block. This will set the original position of our pillars. To start a block in the right size, we set x to 180 and y to 28. After that, we need A Movement Block to execute movement. Select “Glide to X/Y”. We set the time to 2.5 seconds, but don’t hesitate to play with this number. X value must be on the far left. After the pillar reaches this point, they will return to the right. We set x to 280. Because our pillar only moves horizontally, we don’t want the Y value to change at all. To ensure this is the problem, we can drag “Y position” Movement Block to Y.
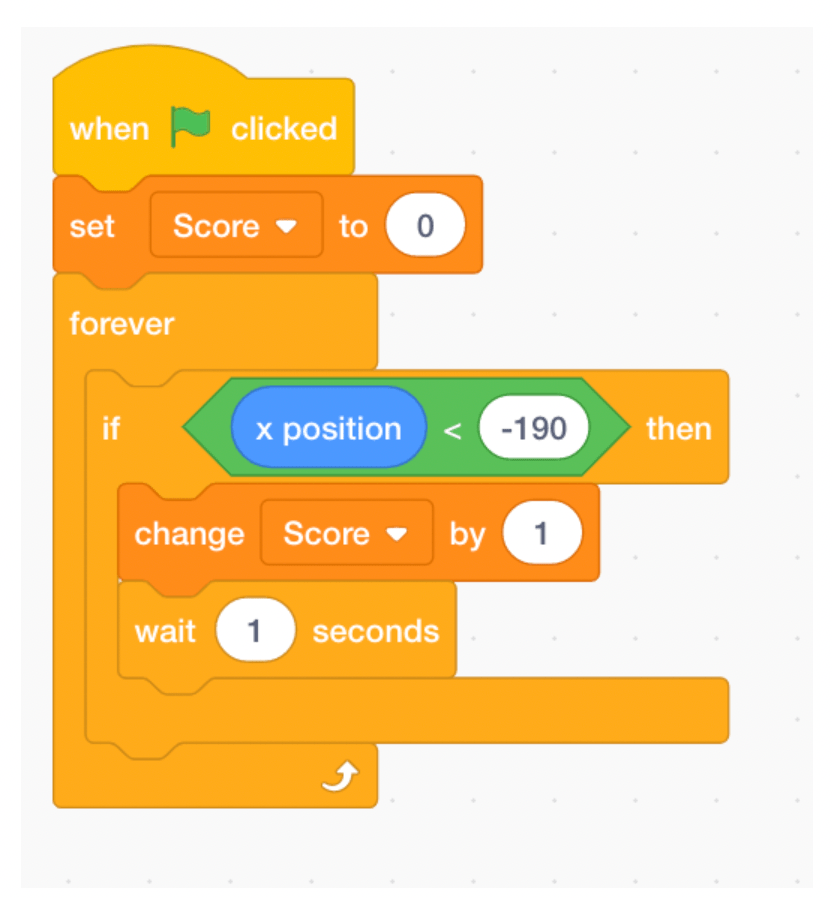
8. Create a score variable
The last step is to track the score, similar to what we do in the flying cat game tutorial. Go to Variable Tab, click “Create a variable” and name “Score”. Get “when the green flag is clicked” Program Block because we will track the score immediately after the game starts. The first Variable The block we want is “Score Set for 0”. This will reset the score at the beginning of each match. You may need to adjust the dropdown option to ensure that it is “score”. Then get both Control Block “forever” and place “if/then” in it.
The condition for the IF statement is when the parrot has flown through the pillar. Parrots only move vertically and not horizontally, so we know the parrot will be flown if the pillar moves past the location of the parrot. In if conditions, we can detect it using the operator “<" block. The left room will be the block “x position” MovementAnd then on the right we put -190. This will check when the pillar has moved past the location of the X parrot.
In the IF/then statement, we want to “change the score with 1” Variable block. We want to increase the score every time the parrot successfully passes! Right after that, we also want to “wait 1 second” Control Block to ensure the score only updates once every time the parrot fly.
And that’s all! We hope you enjoy building your flaft.
For the flappy birds the beginning
I hope you have fun playing your new game! Don’t hesitate to adjust your game with different characters and play with backgrounds and themes. Look at our initial coding for the upcoming children’s class below to learn how to build other cool games. Or help your child try our Scratch Pong game tutorial to continue to build their skills.
Written by Sophie Andrews, Create & Learn Instructor. Sophie Andrews is a student at Stanford University who studies mathematics and computing science. He likes to teach and is a teaching assistant for the Computer Science class Introduction to Stanford. His work focuses on data science. Last year he built an online national voice tracker for Cook Political Report, and currently he leads the data team at Stanford Daily. He is also internated with FCC and national renewable energy lab.
Game Online
Motivation
News
Cek Ongkir Cargo
Jasa Import Door to Door
Gaming Hub
A gaming hub can refer to a central platform or space dedicated to gaming, where players can access games, interact with other gamers, and enjoy related content.


