Making a labyrinth at the beginning is a great beginner level project. The final game is also very fun because you can easily upload or design a different labyrinth and use the same code to play it. In this tutorial, we will show you how to make an initial labyrinth game. We will demonstrate how to create your own labyrinth, control your character escape from the labyrinth with the arrow button, and even adjust your labyrinth with a different theme. Let’s start!
Register your students in our initial class, designed by Pro from Google, Stanford, and MIT for direct expert guidelines because they make cool games (or for those who have previous coding experiences, our middle game development class):
How to make a labyrinth at the beginning
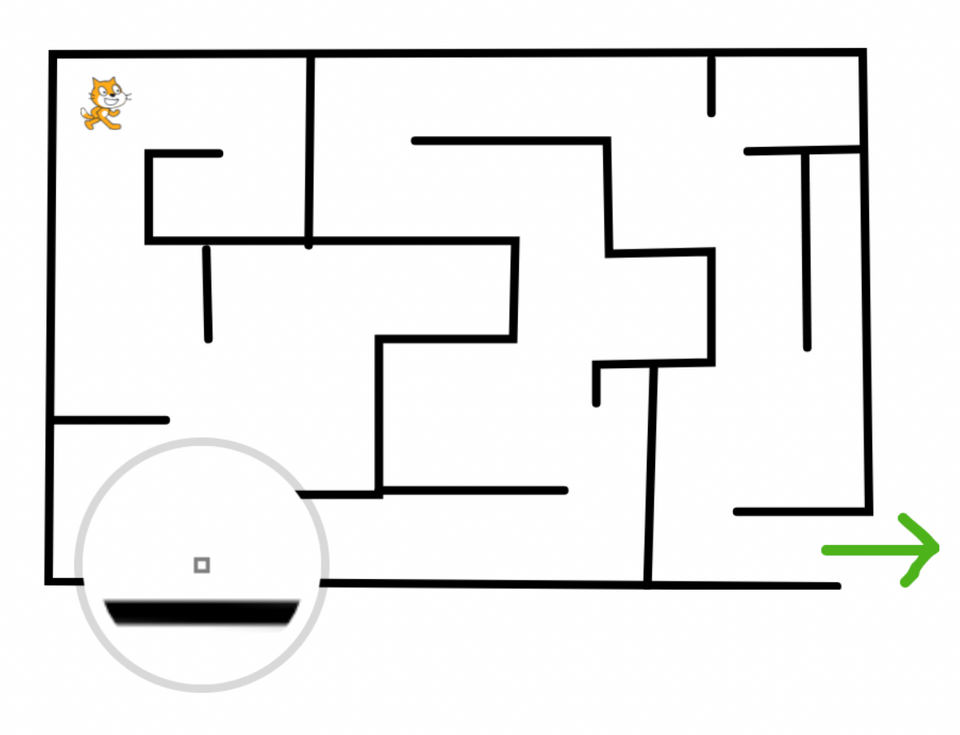
Look at the labyrinth game that we built here, so you can see where we are going! Follow the steps below to see how to do this with the initial coding. Or watch our video that is useful for hearing instructions.
1. Prepare a labyrinth and character
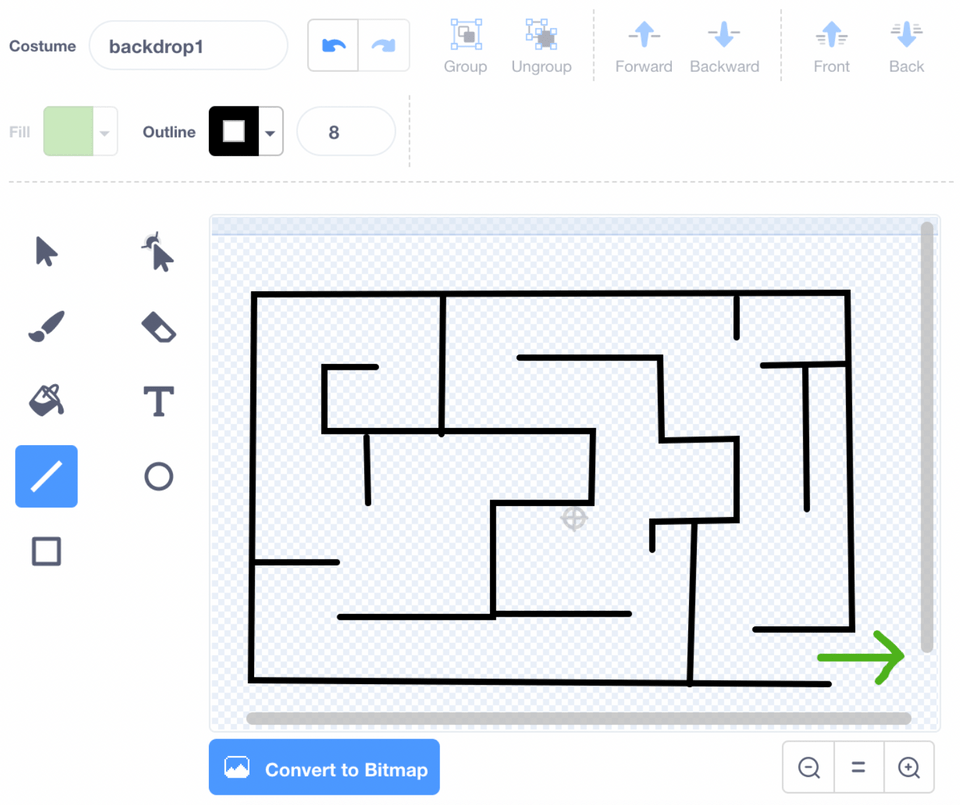
The first thing to do is make a labyrinth. The new project came with a default empty white background. Click the background on the lower right, which will put you in the background edit mode. Then in the upper left horizontal menu, click “Background”.
Use a line image feature (fourth below the left column) to create any labyrinth pattern you want. Then use the brush feature (the second in the left column), and the green arrow image at the labyrinth out point. This is important because it will allow us to detect when players have solved the maze and display a winning message.
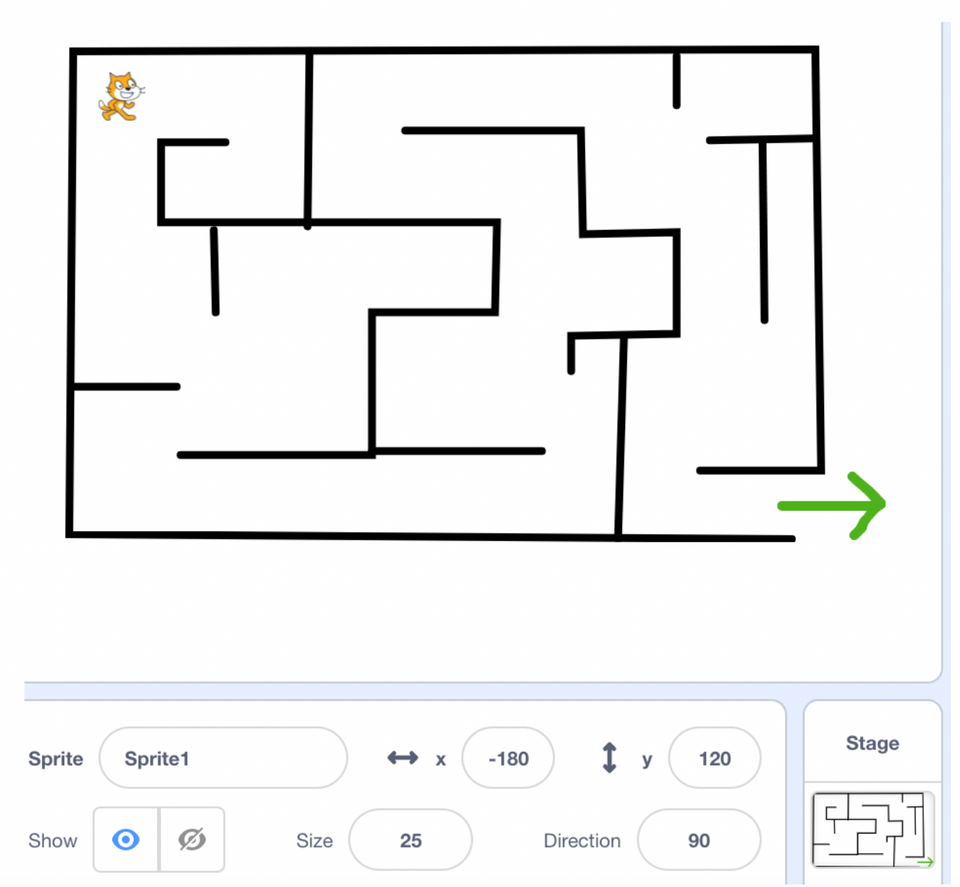
Click the code button in the upper left corner. Then click on the sprite in the lower right corner to return to the sprite editing mode. I use the cat, but don’t hesitate to use whatever you want! We want to make sure our cats are small enough to travel through a labyrinth. Adjust the “size” feature in the lower right panel to 20 (this can be adjusted at any time!).
Then drag the cat to the upper left corner of the map as the initial location. Pay attention to the value of x and y location. In our example, X is -180 and Y are 120. This information allows us to always move cats to the top left location every time we start the game.
2. Write the code for the beginning of the game
Now is the time for the code! Make sure you have clicked on sprite so we add the code only to the character. You can also make the code when the background is selected, but there will be no block block. Check the motion block to make sure you choose a sprite.
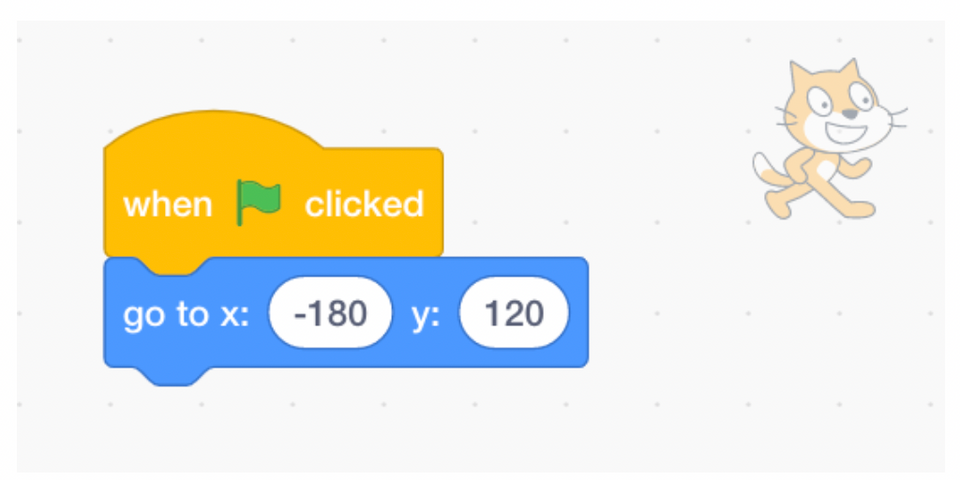
The first block we want is “when green flag clicked” Program. Underneath, we want to “go to x, y” Movement block. We can fill the blanks with a value for the upper left position. For us, X is -180 and 120. This allows us to reset the game every time we reach the green flag.
3. Write the code to control the character with the arrow button
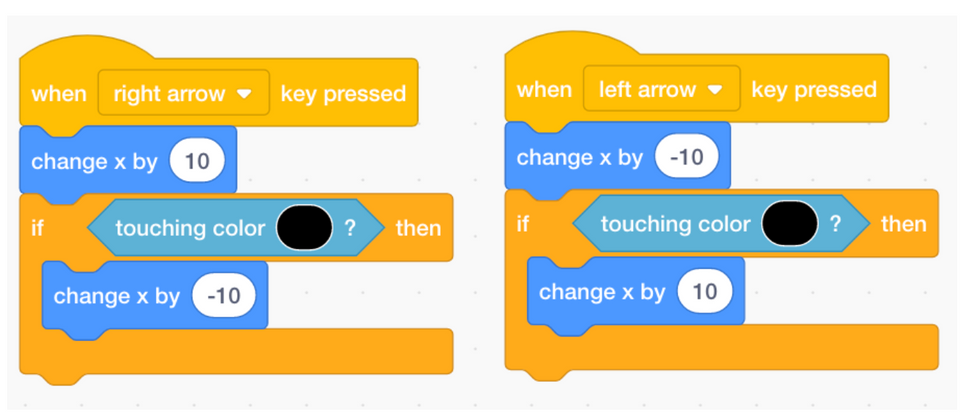
Most of our code will allow us to control cats with our arrow lock. In the ProgramWe want the “When Space to be pressed”, and we need to change the “room” to “right arrow” from drop down.
We want to connect this to “Change X with 10” Movement block. This will allow us to move to the right every time we press the right arrow.
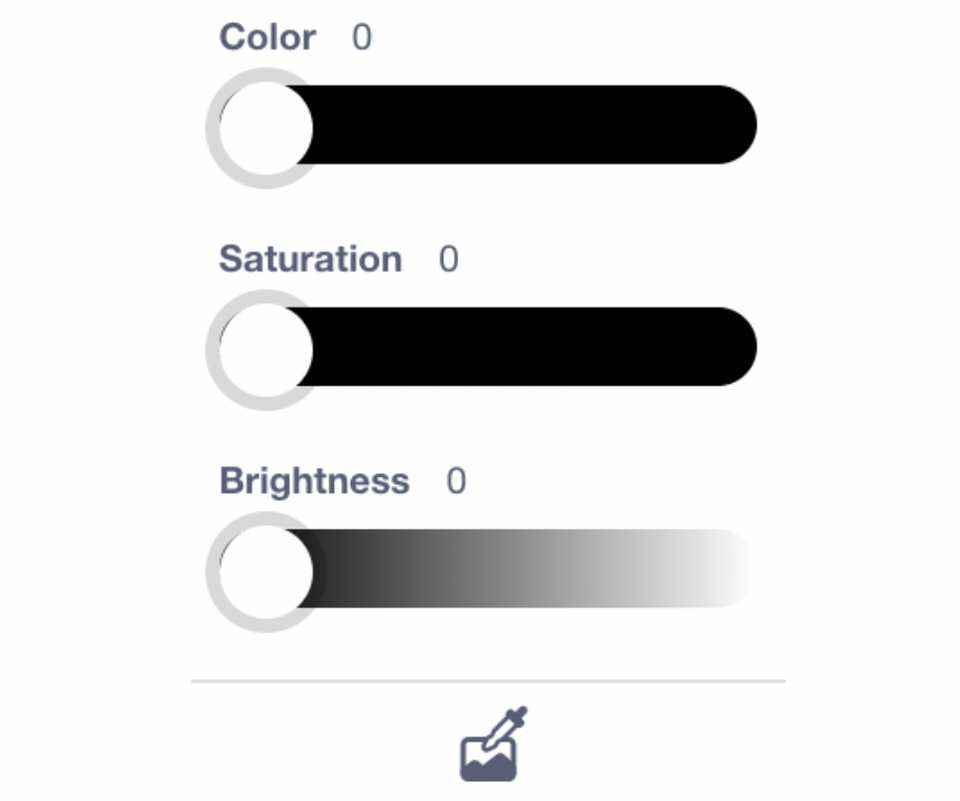
Now, our cats can move, but we also want to prevent cats from walking through our labyrinth walls. To do this, we want to add if/then block it from Control. If the condition is the “touching color” block Sensing. The color will be the color of the line. Scratch has a very cool feature to get the right line color. When you click on the color circle in the sensing block to change it, you will see that you can change the color with three sliders.
But to ensure the color is very suitable for the labyrinth color, you can click on symbols that look like a background with a researcher on it. This will now open us a display where you can float above the background parts and choose colors. In this hover display, click on the line on the edge of the labyrinth, and this will get a labyrinth color for you.
When we touched the labyrinth’s edge, we wanted to cancel the movement we had just done. To do this, we want to “change x” Movement Block in the IF statement, but we want to change the number to -10. In this way, when the code runs, position X is changed by 0 when walking to the wall.

When we hit the left arrow, we wanted a similar horizontal movement to occur, but in the left. Because this code will look similar to the right movements, we can click on the “When Right Arrow Click” block and select “Duplicate”.
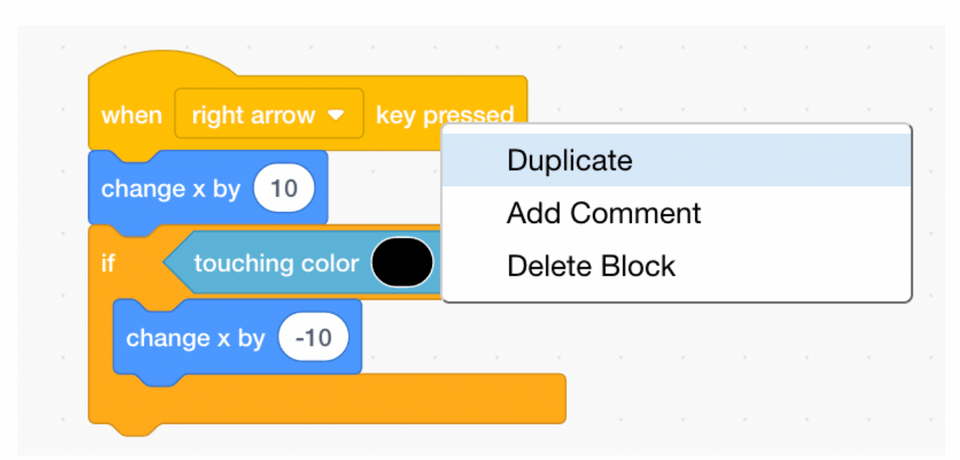
The only change that we need to make in this duplicated block is to change 10 to -10 and change -10 to 10 (this reverses movement). We also want to change the “right arrow” to the “left arrow”.
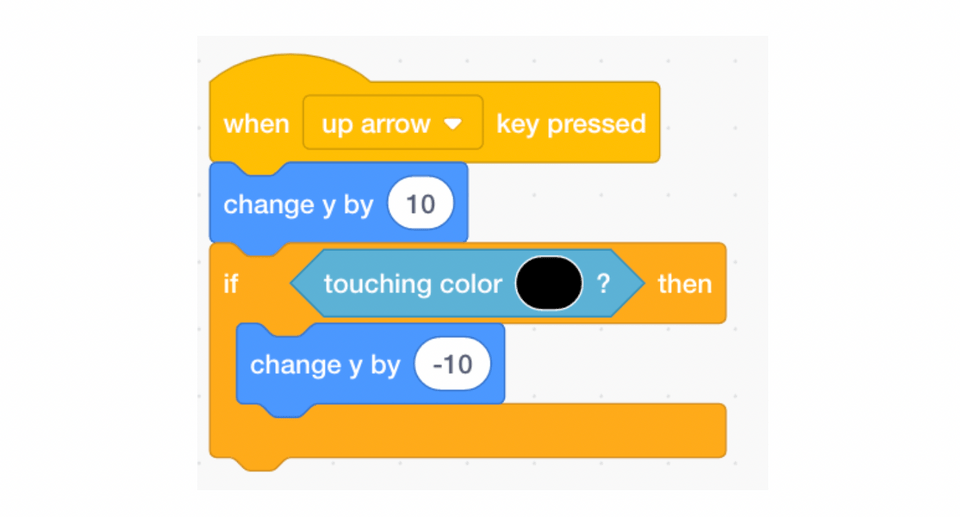
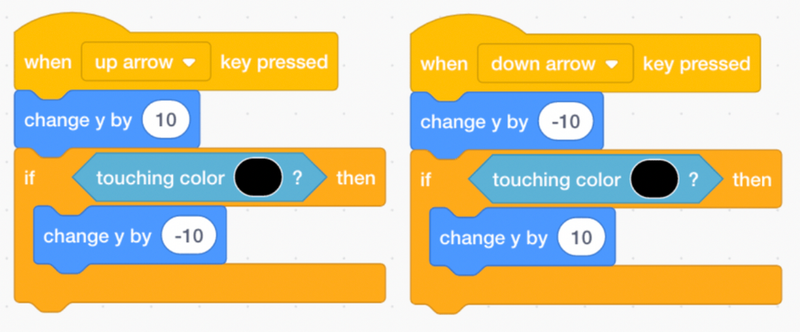
Now we need to handle vertical movements. From Program Get the “When Space Tey Breed” block and change the button to “Up Arrow”. Because this is a vertical movement, we want to add “change y with 10” Movement block.
As before, we need if/then block. The condition remains the same as before: we need A Sensing Color blocks touch and we can use the same trick to get the right color from the maze. In this case if the block, we need to cancel the movement up, and we can do it by putting “changes y” Movement Block inside while ensuring the number -10.
We can duplicate this code for the lower arrow movement through the right -click of the “When Up Arrow Key Block Reduced” and select duplicate. Then we need to make the following small changes: Switch “top arrows” to “lower arrows”, change 10 to -10, and change -10 to 10. This reverses movement, which is expected to remember the movement of up and down is the opposite of each other.
Before moving to the next step, make sure to test your labyrinth.
- Is there a hole where sprite can run away?
- Make sure to return to the background and edit the labyrinth so there are no holes!
- Does the sprite run through the wall?
- Re -check which color you choose for your sensing block!
- Is the sprite too big or too small for your labyrinth?
- Change the sprite size to match your game!
This is a good coding practice to test your code earlier and frequently. This allows you to fix the bug at that time. Don’t forget to run your code while working on your initial project!
4. Show Winning Messages After the Character Flays
We are almost finished. The last thing we need to take care of is to display a winning message.
To do this, let’s make a new background that represents the Win screen. Go to the round “background” button in the lower right corner of the screen. Navigate on this button, and select the “CAT” icon in third place from above. Then open the background editor, and on this empty screen, type a winning message like “Yay You Win !!”. Text editor ranks third in the second column.

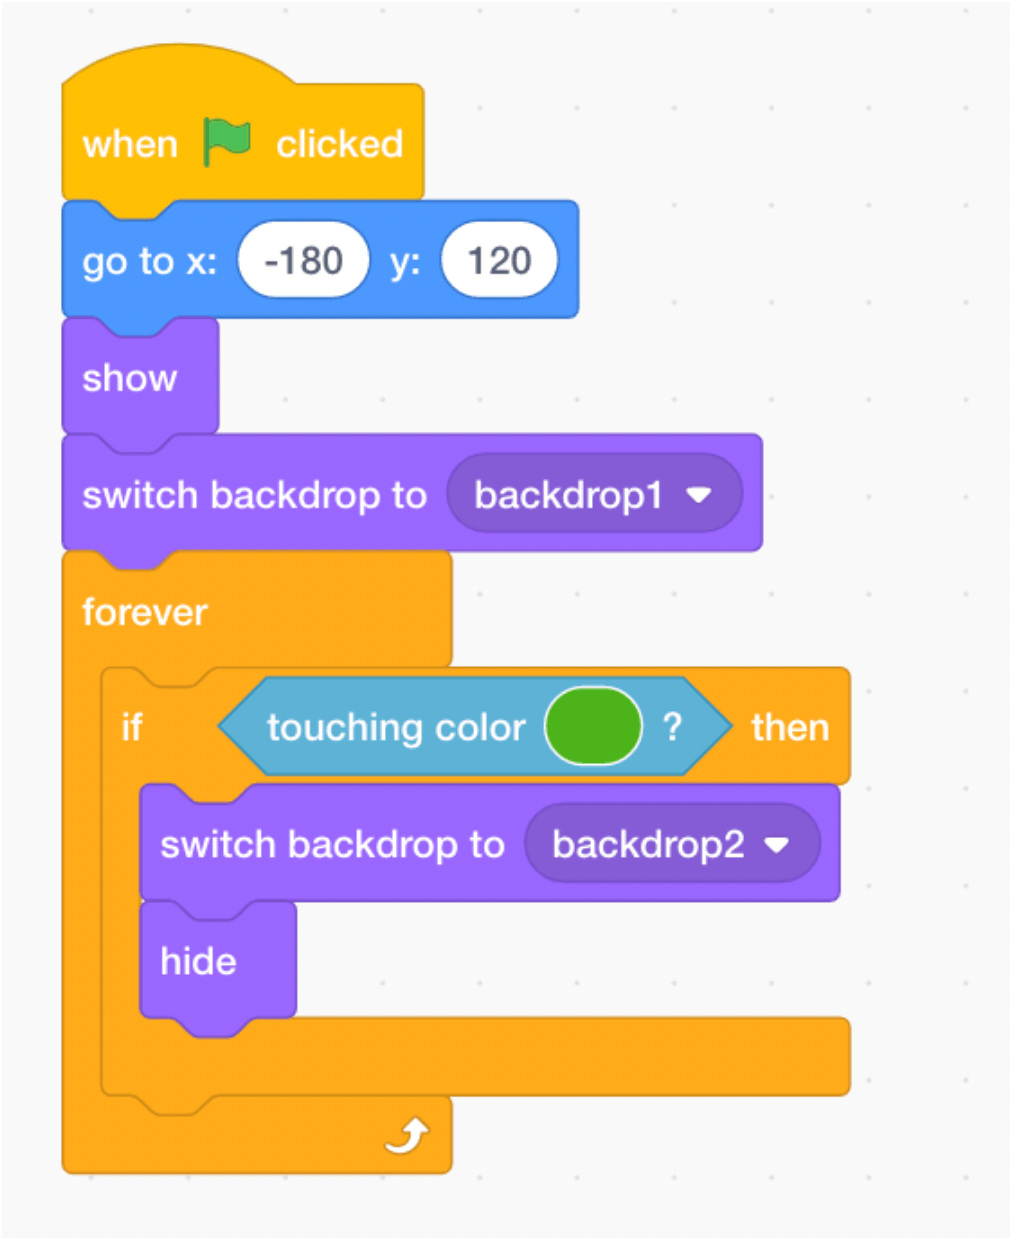
Now we need to update our code to change the background at the right time. Return to the code tab using the top left horizontal menu. You will then click Sprite to access the code. After the “Go To X, Y” block that we already have under “When Green Flag is clicked”, we want to add two appearances of “Show” and “Switch Backdrop to Backdrop1”. The “Switch Backdrop” block has a drop -down menu so make sure the background 1 (or your background name containing a labyrinth) selected. This allows us to reset to the labyrinth every time we start the game after switching to the Win screen.
After this, we need to add a “forever” block from the control because we always want to detect if we have reached the green arrow, signifying the end of the game. In “Forever”, we want to block if/then conditional similar to what we build to detect if the character runs to the wall.
We can use Sensing Block “touching color” to detect when we have reached the arrow and broke the labyrinth. This time, change the color in the sensing block to the color of the arrow using the same hover technique that we use to get the labyrinth color.
In the “if/then” block, we want two Seen block. We first wanted to “Switch Backdrop to Backdrop2”, and be sure to change the background with your winning message. We also want the “Hide” block to make the character disappear from the screen so we only have a winning screen. Good work! You just built a labyrinth at the beginning!
5. Labyrinthic customization
You can also make a labyrinth with themes! We drew our labyrinth in the default white background, but you can first load in one of Scratch’s backgrounds, and then draw a labyrinth on it. Then you can choose a character that matches your theme. For example, you might make crabs under the sea or monkeys in the forest.
Here are five ways to adjust your labyrinth game:
- Special character: Create a unique character by drawing sprite or importing images. Use the “costume” tab to design and turn it on.
- Level design: Add several levels with increasing difficulties. Use a different background for each level and make unique obstacles.
- Power-up and danger: Introducing power-ups such as increased speed or invincible, and dangers such as moving obstacles or enemies.
- Sound and music effects: Increase the experience of the game with the background music and the sound effects triggered by the player’s actions.
- Score and timer: Implement the assessment system and timer to challenge players to complete the labyrinth quickly and get points.
This customization can make the labyrinth game more attractive and personalized.
Key Programming Concepts in Labirin Scratch Game Tutorials
- Sprite: In the beginning, sprite is a character or object that takes action. For this tutorial, we use sprite balls that we can program to move and interact with the environment.
- Program: The event is a trigger that starts the order of action. For example, using “when this sprite clicked” triggers the ball movement.
- Movement: Motion block controls the movement of sprite. By using blocks such as “Move 10 Steps” and “If Edge, Bounce,” we can make the ball move and bounce.
- Condition: Conditional check whether certain conditions are correct. For example, “If it is on the edge, the boutified” check whether the ball touches the edge of the screen and then makes it bounce.
- Loop: Loop repeats the order of instructions. Circles forever can make the ball move without time limit, bounce every time it touches the edge or other sprite.
Sensing: Sensing blocks detect different conditions, such as touching sprite or screen edges. This is important to make the ball bounce off rowing or other sprite.
Fasting -Fun Making a Labyrinous Project in Early
We hope your students have fun to make their labyrinth games! See the initial coding class award winner for children to learn how to make games and other animations. Next, learn how to make a Pacman game at the beginning with a simple tutorial.
Written by Sophie Andrews, Create & Learn Instructor. Sophie Andrews is a student at Stanford University who studies mathematics and computing. He likes to teach and is a teaching assistant for the Computer Science class Introduction to Stanford. His work focuses on data science. Last year he built an online national voice tracker for Cook Political Report, and currently he leads the data team at Stanford Daily. He is also internated with FCC and national renewable energy lab. Updated by Madeline P.
Gaming Hub
A gaming hub can refer to a central platform or space dedicated to gaming, where players can access games, interact with other gamers, and enjoy related content.